~About Me~

My photo
I'm a 20 year old Aussie Girl. Make-up and hair are my passions. I'm not a pro, have pretty much taught myself everything except for a cert. II in hair dressing. My blog will pretty much share my make-up, hair and fashion love

Wednesday, 13 February 2013

Favourite Eye Shadow Brand


Hey Missy's,
It's been a while since I've uploaded anything but I have recently found a new eye shadow brand that I am absolutely in love with. This brand is 'Glamour Doll Eyes.'


They are loose powered, very pigmented colours with a HUGE variety and best of all they are pretty cheap. 

You can order sample sizes (which is what I did) which are:
- $1.25 per 'baggie' which is 0.5g of product
-$2.50 per jar which is 1g of product (and much easier to use then the bag I found)
or you can order the full jar of colour
-$6 which ranges from 1.5g to 2.5g whether or not you get a sifter.

They also tell you if they eye shadows are safe on your lips and nails which I found was great.
They do also have lip glosses, which I have not tried cause I am not really a fan of tinted lip glosses that aren't hugely pigmented like a lipstick, I personally think they look a bit funny. The lip glosses come from another location in the states and are sent separately to their eye shadows. 
The website for these eye shadows are:
Their lip glosses are also on that page, there are links to get to them on the page.

Here are some looks I have created using the eye shadows:
PLEASE remember this is all just messing around, I've never been trained
xxx


Monday, 14 January 2013

Update: make-up, engagement, gap

Hey Missy's
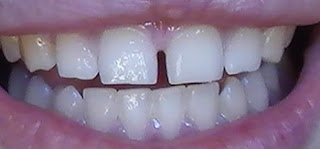
The holiday period has been SO busy for me, Ive began a process to close my gap in my teeth, got engaged(YAY, looking at new homes and been on the hunt for some new make-up.
So far I've got a couple of Two Faced stuff coming in the mail which I will be sure to do a review about when they come. I've also come across an amazing site called http://www.glamourdolleyes.com which seem to have pretty amazing eye shadow colours AND they do sample sizes. I'll be ordering them next time I get paid for sure.

This is my beautiful ring that my finance got me and asked me to marry him on new years during the fireworks :)

Onto my gap. I did a bit of research into ways to close my gap without braces, because there is a 2 year wait to get into the dentist here which I am half way through but it's taking forever, and I stumbled upon a forum which told me about http://www.teethgap.com/ on the website I learnt that bands can be put on the teeth to draw them closer. I looked on other websites and watched youtube reviews and decided I would give them a go. They were a bit pricey the website, however still a lot cheaper then braces, so I decided to look on ebay were I found them for less then $10 including post. In less then a week I had them from the UK in Australia. Here is my progress so far:

Day 1 (before the band):

Day 7:

It's a HUGE difference in just a week. I know that I'm going to have to get a retainer or something similar in the near future but I'm ok with that. I have taken pictures pretty much every day (except day 3) and can't believe how fast and how much it has improved. It's definitely worth a look into if you are self contious about your teeth however it wont work for every problem for your teeth, mine were straight all I needed was to fill the gap. 

Sunday, 16 December 2012

Simple Coloured Mani

Hey Missy's
Just wanted to show you guys how I do my simple Mani's. This one is bright green and black, kind of inspired by Frankenstein.


This look was done using:

OPI Mini (unsure of colour name) Black with Purple, Blue and Green shimmer in it.
ultra3 Nail Colour, in tahitian lime
NYC Color top coat 
Steps:
1. I buffed my nails, cleaned out all the gunk out from under them and fixed sides of my nails.
2. I then put a layer of the Tahitian Lime (green) on my nails (I don't use base coat).
3. Put a second coat of the Tahitian Lime (green) on as this colour is thin (because it's a cheap one).
4. Steadily paint the tips of your nails, if you need to use curved stickers but always paint the tips side to side NOT up and down.
5. Clean up the edges of your nails using cotton buds and nail polish remover and top with a clear top coat.

Purple and Blue Simple Steps

Hey Missy's,
Here is my first step by step tutorial type thing, if you see any problems with it or have any advice I would LOVE to hear it <3


This look was done using:Sleek i-Divine, Ultra Mattes V1 Brights Palette, Colours: BOLT (blue) and Powi.Rimmel, 

Stay Matte Foundation in 103 (True Ivory)
Classics Translucent Loose Powder
Maybelline New York Pulse Perfection vibrating mascara in Blackest Black
Lime Crime OrchidAceous (Purple) Liner 
Nivea Lip Care
Lime Crime lipstick in Poisonberry
Victoria Jackson Palette, Mystic Eyes (for eyebrows)


Steps:1. After my usual foundation and powder routine I applied  Bolt (blue) all over my eye lid up just past the crease.
2. I put Bolt (blue) half way under my eyes from the outer corner using an angled brush.
3. I lined the top of my eyes with the OrchidAceous Liner and flicked out the corner.
4. I filled in my eyebrows with the Victoria Jackson Palette (didn't take a picture of it sorry) 
5. Sprayed a bit of hairspray to set the eye make-up (there is proper stuff you can get to set the make-up but I use hairspray cause it's easier to find here)
6. Apply mascara.
7. Apply lip balm and Poisonberry lipstick and these are the finished photos.
Hope you liked this pretty simple look <3 <3 <3


Tuesday, 11 December 2012

Summer Urban Decay Nails

Hey Missy's,
Been a while since I've posted anything and I will soon be doing step by step pictures to help you ladies create the same look or even how to customise it to make it your own :)

Here is my nails that I wore last week which I created using the Urban Decay Rollergirl Nail Kit, which I'm absolutely in love with. The Packaging is cute and they are cute little mini nail polishes. They nail polishes are seriously to die for.


I always do my tips free hand but if you need to use those stickers to help you get a perfect curve go for it :) I just like it not looking perfect so it doesn't look fake (Thats just me)

**Excuse my old woman hands haha and my blood blister on my pointer finger**

Thursday, 22 November 2012

Rainbow sleek

I recently got a new palette in the mail from 'Sleek' called Ultra Mattes V1 from their i-Divine range. This is the first Sleek brand product that I have got and I'm rather surprised (in a good way) with how much I like it. The only faults that I could find with it was the colour bolt (blue) it didn't go on as evenly that I would have liked however I don't use primer and that the colour powi (white) wasn't as white as I'd like.
The colours are pretty amazing and I will be getting more of their products, they are pretty cheap (12 colours for $10) and good quality, and they would look even more amazing with primer.


^^^
This is their photo from their website for the palette but it really doesn't do the colours justice, they are a fair bit brighter. If you go their website they also show swatches on light, medium and dark skin tones for most of their products, which is extremely helpful.


This look was done using:
Sleek i-Divine, Ultra Mattes V1 Brights Palette, Colours: BAMM! (yellow), POUT (pink), SUGARLITE (purple) and BOLT (blue).
Maybelline New York Dream Liquid Mousse Foundation in Light 2
Classics Translucent Loose Powder
Maybelline New York Pulse Perfection  vibrating mascara in Blackest Black (top lashes only)
Lime Crime lipstick in Poisonberry